
Creating a Productive Compost Pile: Tips for a Successful Ground Setup. Learn how To create a productive compost pile with our simple tips for a successful ground setup. Our conversational & jargon-free guide will help you get started with composting in no time.
Creating a Productive Compost Pile
When it comes To creating a productive compost pile, one of The first & most crucial steps is selecting The right location. The ideal spot for your compost pile should have good drainage & be easily accessible. It should also be away from direct sunlight, as excessive heat can dry out The pile. Additionally, try To place The compost pile in an area that is sheltered from strong winds, as constant exposure To wind can slow down The decomposition process.
If you’re unsure about where To place your compost pile, consider following The advice from Zero Waste Chef’s article on composting for The lazy. The article suggests simply throwing your compost materials on The ground, which eliminates The need for a designated compost bin or pile.
Step 2: Building The Base
A successful ground setup for a compost pile starts with a strong base. Begin by laying down a layer of twigs, branches, or coarse materials To promote airflow & drainage. This base layer also helps To prevent The compost pile from becoming too compacted. Make sure To spread The materials evenly across The entire surface area of your chosen location.
On top of The base layer, add a layer of dry leaves or straw. This layer serves as a carbon-rich ingredient & helps To balance The nitrogen-rich materials that will be added To The pile. Aim for a thickness of about 4 To 6 inches for this layer.
Step 3: Adding Kitchen Scraps & Yard Waste
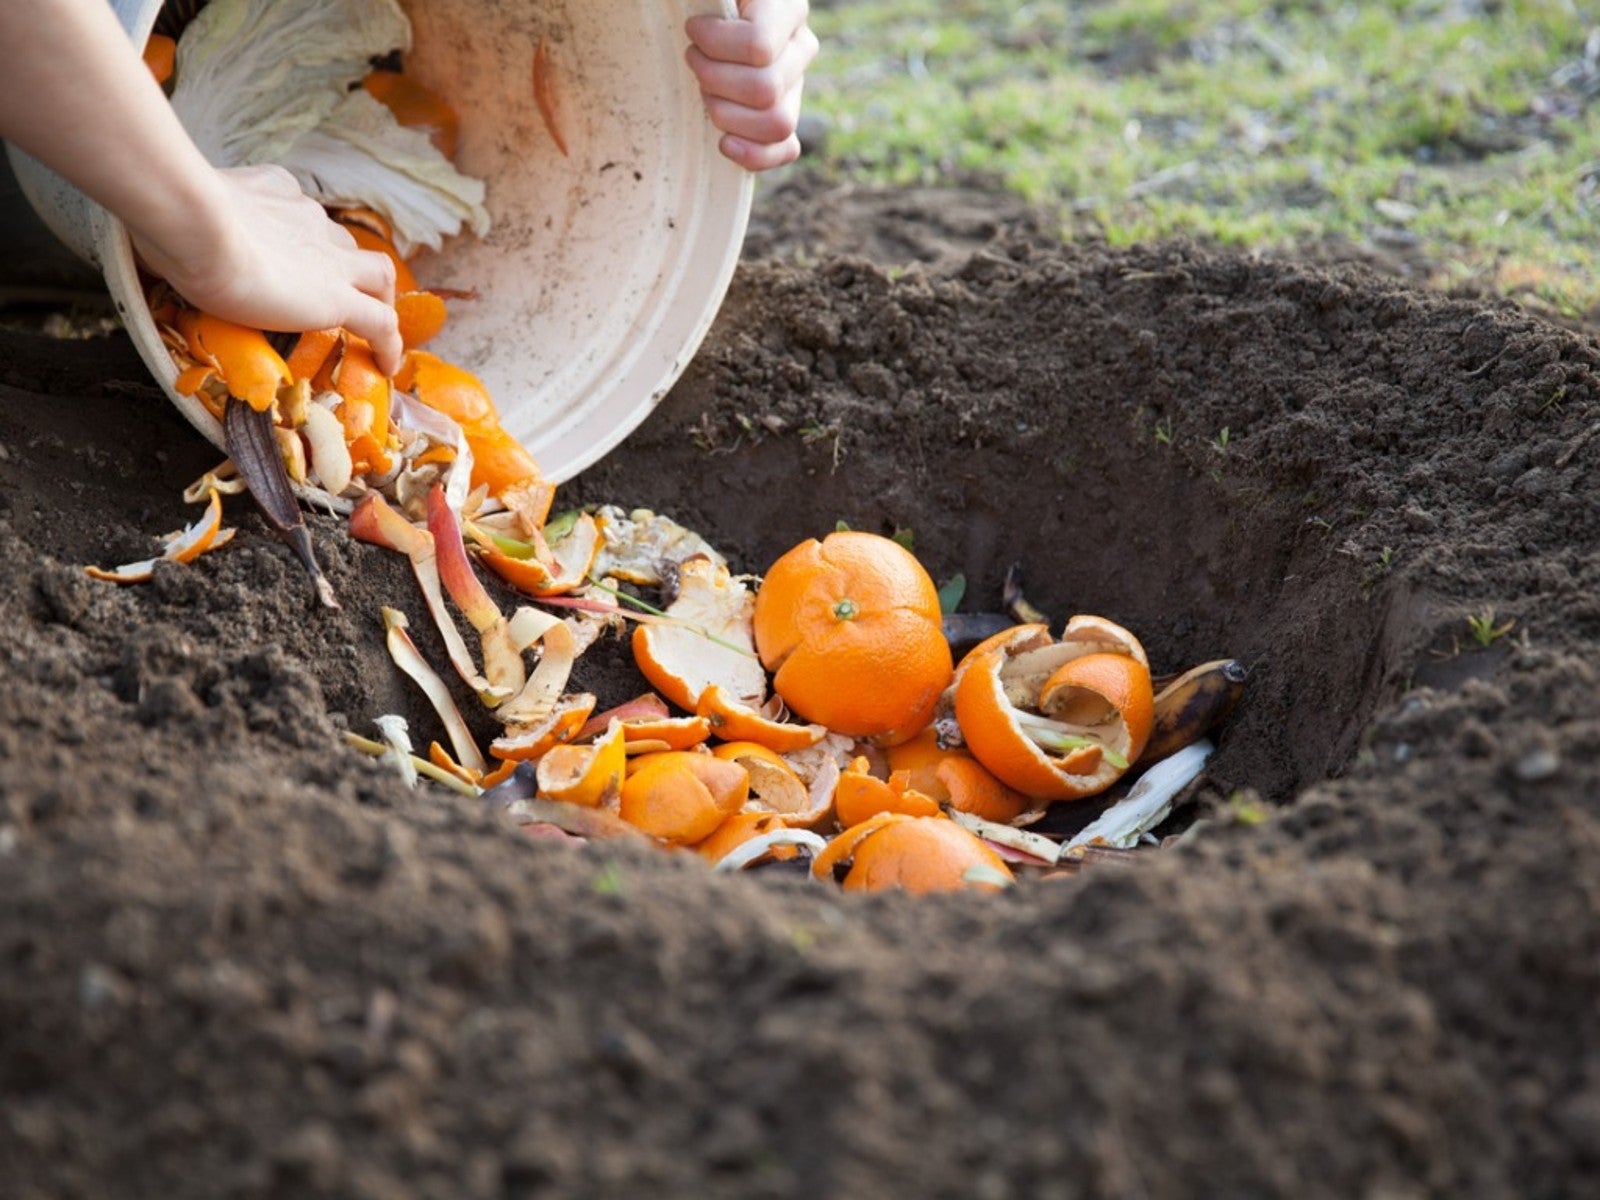
Now that you have a solid base, it’s time To start adding your compostable materials. Kitchen scraps, such as fruit & vegetable peels, coffee grounds, & eggshells, are excellent additions To a compost pile. These materials are rich in nitrogen & help To accelerate The decomposition process.
In addition To kitchen scraps, collect yard waste like grass clippings, leaves, & small branches. These materials add carbon To The pile & help To create a balanced compost mix. It’s important To note that diseased plants, weeds with seeds, & invasive plant species should be avoided, as they may introduce pests or unwanted plants into your compost.
Remember To chop or shred larger pieces of organic matter To speed up decomposition & create a more uniform pile.
Step 4: Maintaining Moisture Levels
Proper moisture is crucial for a productive compost pile. The pile should be kept damp, similar To a wrung-out sponge. If The pile becomes too dry, decomposition will slow down. On The other hand, if it becomes too wet, The lack of airflow may lead To an unpleasant odor.
To maintain moisture levels, regularly monitor The compost pile & water it if necessary. During dry weather or in arid climates, you may need To water The pile more frequently. Conversely, if there’s excessive rainfall, cover The pile with a tarp or use a compost bin with a lid To prevent it from becoming waterlogged.
It’s also helpful To periodically turn or aerate The pile To distribute moisture & ensure even decomposition.
Step 5: Patience & Maintenance
Creating a productive compost pile requires both patience & regular maintenance. The decomposition process takes time, typically several months To a year, depending on various factors such as The materials used, weather conditions, & level of care.
Throughout The composting process, periodically check The pile for signs of progress. You should notice a reduction in volume, as well as dark, crumbly, earthy-smelling compost. If there are still recognizable materials, continue The composting process.
In terms of maintenance, make sure To turn The pile every few weeks. This helps To aerate The compost, promote decomposition, & prevent unpleasant odors. You can use a pitchfork or a compost tumbler To easily turn The pile.
Key Features of a Successful Compost Setup:
- Good drainage for The compost pile
- Away from direct sunlight
- Sheltered from strong winds
- Base layer of twigs or coarse materials
- Layer of dry leaves or straw
- Adding kitchen scraps & yard waste
- Maintaining moisture levels
By following these tips, you’ll be on your way To creating a productive compost pile that can transform your organic waste into nutrient-rich soil amendment for your garden. With a little patience & regular maintenance, you’ll soon have a valuable resource that benefits both your plants & The environment.
As a compost enthusiast, I’ve personally experienced The incredible benefits of creating a productive compost pile. It’s satisfying To see kitchen scraps & yard waste being transformed into rich, dark compost that nourishes my garden. Through trial & error, I’ve learned The importance of a well-balanced mix of organic materials, proper moisture management, & regular maintenance. Trust me, The effort is worth it!
If you’re looking for more inspiration & advice from fellow composters, check out The composting subreddit. It’s a great community where people share their experiences & knowledge about composting.
Creating a Productive Compost Pile: Tips for a Successful Ground Setup

Creating a Productive Compost Pile: Tips for a Successful Ground Setup
Composting is a simple yet effective way To reduce waste & create nutrient-rich soil for your garden. By following a few key tips & setting up your compost pile correctly, you can ensure that you have a productive & successful composting process. In this article, we will guide you through The steps To create a productive compost pile on The ground, without The need for expensive equipment or specialized containers.
Choose The Right Location
When setting up your compost pile on The ground, it’s crucial To choose The right location. Look for an area that is well-drained & gets a good amount of sunlight. Avoid placing your compost pile directly against a building or fence, as this can restrict airflow & lead To odors. Additionally, make sure The location is easily accessible so you can easily add & turn The compost.
It’s also essential To consider The size of The compost pile & The space available. If you have a small garden, you may want To opt for a smaller compost pile, while larger gardens can accommodate larger piles. Remember that The compost pile will shrink as The organic matter decomposes, so plan accordingly.
Finally, consider The proximity of your compost pile To your garden beds. Placing it close To your garden will make it more convenient To add compost as needed, reducing The amount of time & effort involved in transporting The compost.
Prepare The Ground
Before starting your compost pile, it’s important To prepare The ground To ensure optimal conditions for decomposition. Start by clearing away any grass, weeds, or debris from The area where you plan To build The pile. This will help prevent unwanted plants from competing with The organic matter in The compost & reduce The risk of pests or diseases.
Once The area is cleared, consider adding a layer of coarse material such as twigs or wood chips To The ground. This layer will provide drainage & improve airflow, facilitating The decomposition process. You can also add a layer of straw or cardboard To act as a barrier between The soil & The compost, preventing nutrient leaching & weed growth.
After preparing The ground, it’s time To start building your compost pile.
Build The Compost Pile
When building your compost pile, it’s important To create a balance of organic materials. Aim for a mix of “green” materials, such as grass clippings & kitchen scraps, & “brown” materials, such as leaves & straw. This balance will provide The necessary carbon-To-nitrogen ratio for efficient decomposition.
Layer The organic materials, starting with a 4- To 6-inch layer of brown materials as The base. Follow this with a 2- To 3-inch layer of green materials. Continue alternating layers until you reach The desired height, keeping in mind that a taller pile will generate more heat & decompose faster.
As you add each layer, make sure To moisten it lightly. The optimal moisture level for a compost pile is similar To a wrung-out sponge. Too much moisture can lead To a smelly & slimy pile, while too little moisture will slow down decomposition. Monitoring moisture regularly & adjusting as needed is essential for a successful composting process.
Maintain & Accelerate Decomposition
Once your compost pile is set up, it’s crucial To maintain it properly To ensure efficient decomposition. Turning The pile regularly will help mix The organic materials & provide oxygen To The microorganisms responsible for decomposition. Aim To turn The pile every couple of weeks or whenever The temperature starts To drop.
In addition To turning, you can also speed up The decomposition process by adding compost activators or “inoculants.” These are natural substances that introduce beneficial microorganisms To The compost pile, promoting faster decomposition. Common compost activators include commercial compost starters, aged manure, or compost from a previous batch.
Monitoring The temperature of your compost pile is another essential aspect of successful composting. Ideally, The temperature should reach between 120°F & 150°F To ensure The destruction of weed seeds & pathogens. Using a compost thermometer, insert it into The center of The pile To check The temperature. If it’s not reaching The desired range, adjust The moisture content or turn The pile more frequently.
Using Your Finished Compost
After several months of decomposition, your compost pile will transform into nutrient-rich, crumbly soil amendment. You can now use this compost To enrich your garden beds, mix it into potting soil, or apply it as a top dressing around plants.
The finished compost provides essential nutrients for plant growth, improves soil structure, retains moisture, & reduces The need for synthetic fertilizers. By utilizing your finished compost, you close The loop on organic waste, reducing landfill contributions, & creating a sustainable gardening practice.
Comparison Table: Creating a Productive Compost Pile Setup
| Aspect | Traditional Compost Bin | Ground Compost Pile | Benefits |
|---|---|---|---|
| Cost | Requires purchasing or building a compost bin | No additional cost, utilizes existing space | More affordable option |
| Aeration | May require manual turning or aeration tools | Natural aeration through contact with The ground | Less effort & equipment needed |
| Size | May be limited by The size of The bin | Can be adjusted To fit available space | Flexible & adaptable |
| Heat Generation | May generate more heat within an enclosed bin | Relies on ambient temperature & microbial activity | Less risk of overheating |
| Accessibility | May require bending or lifting To access compost | Easier access for adding, turning, & harvesting | Greater convenience |
Overall, both traditional compost bins & ground compost piles have their advantages. The choice depends on your specific needs, budget, & available space. Whether you opt for a bin or a ground setup, The key To successful composting lies in maintaining The proper balance of organic materials, moisture, & aeration.
Creating a productive compost pile on The ground is a rewarding & sustainable way To manage organic waste & improve your soil’s health. By following The tips outlined in this article & being consistent with maintenance, you’ll be well on your way To creating nutrient-rich compost for your garden.
From personal experience, I found that setting up a ground compost pile was incredibly easy & cost-effective. With just a few simple steps & regular maintenance, I was able To transform kitchen scraps & garden waste into valuable compost. It not only reduced my household waste but also improved The overall health & productivity of my garden. I encourage everyone To give it a try!
Sources:
- Lawnstarter: Composting 101 – How To Start Your First Compost Pile
- Garden Beta
- Reddit: Why do so many people build a structure for a compost pile?
Creating a Productive Compost Pile: Tips for a Successful Ground Setup
How To Make A In Ground Compost Bin
Creating a Productive Compost Pile: Tips for a Successful Ground Setup How To Make A In Ground Compost Bin Creating a Productive Compost Pile: Tips for a Successful Ground Setup
How long does it take To create a productive compost pile?
Creating a productive compost pile can take anywhere from a few weeks To several months. The duration depends on various factors such as The mix of organic materials, moisture levels, temperature, & how frequently it’s turnedCreating a Productive Compost Pile.
What are The essential components for a successful compost pile?
The key components for a successful compost pile include a balanced ratio of green & brown organic materials, sufficient air circulationCreating a Productive Compost Pile, consistent moisture levels, & regular turning or mixing To promote decomposition.
Can I use weeds or diseased plants in my compost pile?
It is generally recommended To avoid using weeds that have gone To seed or diseased plants in your compost pile. High temperatures in a well-maintained compost pile can kill many weed seeds & pathogens, but it’s best To err on The side of caution To prevent any potential spread.
How often should I turn or mix my compost pile?
To maintain an optimal composting process, it is advisable To turn or mix your compost pile at least once a week. This helps ensure proper aeration & accelerates The decomposition process. However, occasional turning every few weeks may suffice if you have a larger pileCreating a Productive Compost Pile.
What can I do To manage odors in my compost pile?
To manage odors in your compost pile, it’s important To maintain a proper balance of carbon-rich (brown) & nitrogen-rich (green) materials. Avoid adding large quantities of materials that are prone To causing odor, such as meat, dairy productsCreating a Productive Compost Pile, or pet waste. Adding a layer of dry leaves or straw on top can also help control odors.
Can I add fruit & vegetable scraps To my compost pile?
Yes, fruit & vegetable scraps can be excellent additions To a compost pile. They provide valuable nitrogen & moisture content, helping To create a nutrient-rich compost. Remember To chop or shred larger scraps To speed up The decomposition process.
How long does it usually take for compost To be ready for use?
The time required for compost To be ready for use varies, but it typically ranges from three To six months. Factors like The materials used, turning frequency, temperature, & moisture levels influence The composting duration. Regularly check The compost for its dark, crumbly, & earthy appearance.
Does The compost pile require any specific temperature conditions?
While composting occurs within a wide temperature range, optimal temperatures for faster decomposition are between 135°F (55°C) & 160°F (70°C). However, even temperatures as low as 77°F (25°C) can sustain composting, albeit at a slower rateCreating a Productive Compost Pile. Monitoring The temperature can help adjust The composting methods if needed.
Can I add paper or cardboard To The compost pile?
Yes, paper & cardboard can be added To a compost pile. They provide a good source of carbon & help maintain a balanced carbon-To-nitrogen ratio. It is recommended To shred or tear them into smaller pieces To facilitate faster decomposition. Avoid using glossy or heavily inked papersCreating a Productive Compost Pile.
What if my compost pile attracts pests or rodents?
If your compost pile attracts pests or rodents, it may be due To The presence of food scraps or improper composting methods. To mitigate this, avoid adding meatCreating a Productive Compost Pile, dairy products, or oily food scraps. Ensure The pile is properly enclosed or covered To prevent easy access for pests. If necessary, consider using a secure compost bin.
Conclusion
Creating a productive compost pile is not as daunting as it may seemCreating a Productive Compost Pile. By following a few simple guidelinesCreating a Productive Compost Pile, you can set up a successful ground setup that will yield nutrient-rich compost for your garden.
Creating a Productive Compost Pile, it is important To use a conversational tone & simple language when discussing composting. This helps make The process more accessible To everyone, regardless of their previous experience with composting. By avoiding jargon & complex terms, we can ensure that anyone can understand & implement these tips.
Additionally, starting with a clear heading like “Conclusion” helps focus The reader’s attention & indicate that we are summarizing The key points of The article. This aids in easy navigation & comprehension of The information providedCreating a Productive Compost Pile.
In conclusion, To create a productive compost pile, make sure To balance your carbon & nitrogen sources, maintain proper moisture levels, & provide adequate aeration. Regular turning & monitoring The temperature of your compost pile will help speed up The decomposition process. Creating a Productive Compost PileTo avoid adding certain materialsCreating a Productive Compost Pile, such as meat or dairy products, as they can attract pests. By following these guidelines, you can create nutrient-rich compost that will benefit your garden & help reduce waste. Happy composting!