
Create Stunning Glass Plate Garden Flowers: A Step-by-Step Guide. Learn how To create beautiful garden flowers using glass plates with this easy step-by-step guide. Discover The secrets To crafting stunning floral masterpieces in your own backyard. No need for fancy terminology or complicated techniques, just simple instructions for a breathtaking garden.
Create Stunning Glass Plate Garden Flowers
Are you looking for a unique & eye-catching addition To your garden? Glass plate garden flowers are The perfect solution! These stunning decorations are easy To make & will add a touch of whimsy & color To any outdoor space. In this step-by-step guideCreate Stunning Glass Plate Garden Flowers, we will show you how To create your own glass plate garden flowers. Let’s dive in!
Materials Needed:
- – Glass plates of varying sizes & colors
- – Glass adhesive or silicone adhesive
- – Metal rods or dowels
- – Spray paint
- – Clear sealant spray
- – Glass beads or marbles (optional)
- – Gloves & safety glasses
Step 1: Gather Your Materials
Before you begin, gather all The materials you will need for this project. Make sure To have a variety of glass plates in different sizes & colorsCreate Stunning Glass Plate Garden Flowers. You can find these at thrift stores, garage sales, or online. Additionally, gather your adhesive, metal rods, spray paintCreate Stunning Glass Plate Garden Flowers, clear sealant spray, & any optional materials like glass beads or marbles.
Step 2: Prepare Your Workspace
Find a flat & well-ventilated area To work on your glass plate garden flowers. Lay down a protective covering, like old newspapers or a drop cloth, To catch any spills or drips. Wear gloves & safety glasses To protect yourself during The crafting process.
Step 3: Clean & Paint The Plates
Start by thoroughly cleaning The glass plates To remove any dirt or residue. Once clean, you can spray paint The plates in The desired colors. This step is optional but adds a fun & vibrant touch To your garden flowers. Allow The paint To dry completely before proceeding To The next step.
Step 4: Attach The Plates
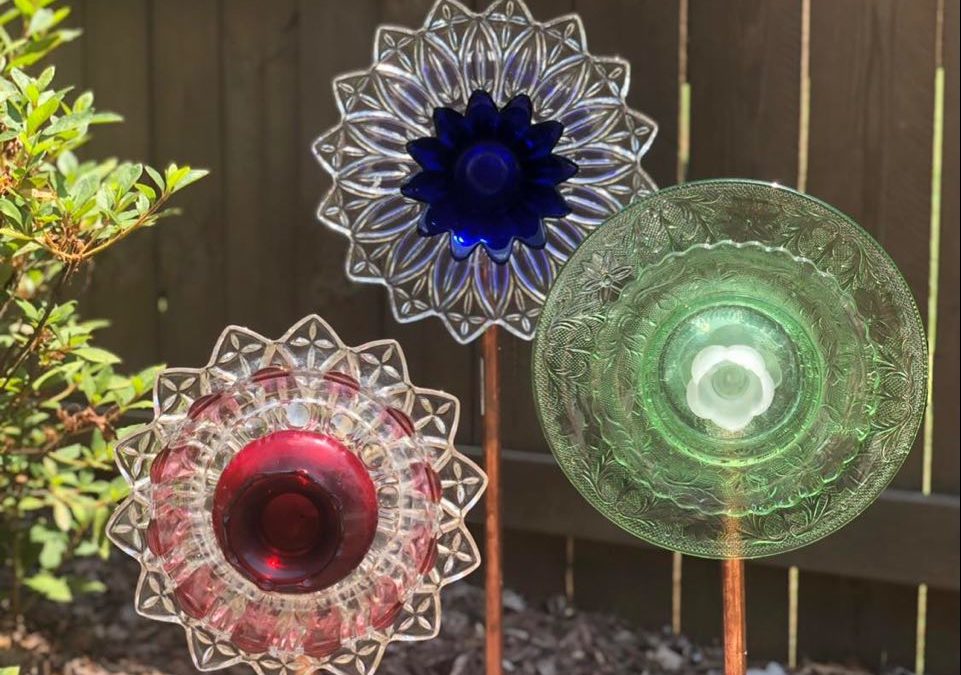
Using your adhesive, carefully attach The glass plates together To create The flower shape. Start with The largest plate at The bottom & work your way up, stacking smaller plates on top. Make sure To apply The adhesive evenly & let it dry according To The manufacturer’s instructions. You can add glass beads or marbles between The plates for added sparkle & dimension if desired.
Step 5: Secure The Stem
To create a stem for your glass plate garden flower, insert a metal rod or dowel into The ground at your desired location. Make sure The rod is long enough To support The height of your flower. Attach The flower To The top of The rod using adhesive or by securing it with wire or zip ties.
Step 6: Apply a Sealant
To protect your glass plate garden flowers from The elements, apply a clear sealant spray To The entire surface of The plates. This will help prevent chipping, fading, & damage caused by sun, rain, or wind. Follow The instructions on The sealant spray for best results.
Step 7: Display & Enjoy!
Once The adhesive & sealant are fully dry, you can proudly display your beautiful glass plate garden flowers in your outdoor space. Arrange them in flower beds, planters, or even create a glass plate garden flower bouquet. These unique decorations will surely be a conversation starter & bring joy To all who see them.
My Experience Creating Glass Plate Garden Flowers
I decided To try my hand at making glass plate garden flowers after seeing some stunning examples online. I had never attempted a project like this before, but I was excited To give it a try. Gathering The materials was a fun adventure, as I scoured thrift stores & flea markets for unique & colorful glass plates. Once I had everything I needed, I set up my workspace & got To work.
Cleaning The plates was a breeze, & I enjoyed adding a pop of color with The spray paint. The most challenging part for me was attaching The plates together. It required a steady hand & patience, but The end result was well worth it. Once The adhesive dried & I secured The flowers To metal rods, they looked absolutely stunning in my garden.
I applied The clear sealant spray To ensure The longevity of my glass plate garden flowers. I was thrilled with The final outcome & couldn’t wait To show off my creation To friends & family. These unique decorations have become a focal point in my garden & have received many complimentsCreate Stunning Glass Plate Garden Flowers.
Creating glass plate garden flowers was a rewarding experience that allowed me To unleash my creativity & add a touch of elegance To my outdoor spaceCreate Stunning Glass Plate Garden Flowers. I highly recommend giving it a try!
Key Aspects of Create Stunning Glass Plate Garden Flowers
Some key aspects To consider when creating glass plate garden flowers include:
- – Varieties of glass plates & colors: Using a variety of glass plates with different sizes & colors will add visual interest & depth To your garden flowers.
- – Adhesive selection: Choosing The right adhesive for glass can be crucial To ensure a durable & long-lasting bond between The plates.
- – Stem support: Creating a sturdy stem using metal rods or dowels will help your glass plate garden flowers stand tall & withstand outdoor elements.
- – Protective sealant: Applying a clear sealant spray will extend The lifespan of your glass plate garden flowers by protecting them from weather damage.
- – Optional embellishments: Adding glass beads or marbles between The plates can enhance The overall aesthetic of your garden flowersCreate Stunning Glass Plate Garden Flowers.
So why wait? Get creative & start crafting your own stunning glass plate garden flowers today!
🌺 Features of Create Stunning Glass Plate Garden Flowers 🌺
- – Easy To make
- – Affordable materials
- – Customizable colors & designs
- – Weather-resistant
- – Unique & eye-catching
- – Suitable for all skill levels
- – Adds a touch of whimsy & charm To any garden
Remember, The possibilities are endless when it comes To creating your own glass plate garden flowers. Let your imagination run wild & have fun with this creative project!
For a visual guide & more inspiration, check out this video on how To create glass plate garden flowers: Glass Plate Garden Flowers Tutorial.
If you’re looking for additional ideas & tips, visit this website: The Shabby Tree – DIY Glass Garden Flowers.
Remember To follow The steps carefully, take your time, & enjoy The process of creating your very own stunning glass plate garden flowers. Happy crafting!
Create Stunning Glass Plate Garden Flowers: A Step-by-Step Guide
Introduction
In this comprehensive guide, we will walk you through The step-by-step process of creating stunning glass plate garden flowers. This creative & unique art project will add a pop of color & whimsy To your outdoor space, & can be enjoyed year-round. Whether you are a seasoned DIY enthusiast or a beginner looking for a fun & easy project, this guide is for you. So gather your materials & let’s get started!
Gather Your Materials
Before you begin, it’s important To gather all The necessary materials. Here’s a list of what you’ll need:
- Glass plates of various sizes & shapes
- Epoxy adhesive
- Outdoor spray paint
- Garden stakes or rebar
- Decorative glass gems or marbles
- Ceramic or glass adhesive
- Gloves & safety glasses
Step 1: Prepare The Glass Plates
Start by cleaning The glass plates with soap & water To remove any dirt or grime. Dry them thoroughly with a clean cloth. Create Stunning Glass Plate Garden Flowers, apply a thin layer of epoxy adhesive To The flat side of one glass plate. Press it firmly onto another glass plate, aligning them as desiredCreate Stunning Glass Plate Garden Flowers. Repeat this process To create multiple layers & achieve The desired height of your flower.
Pro tip: Experiment with different plate sizes & shapes To create unique & visually appealing flowers.
Step 2: Paint The Glass Plates
Once The adhesive has fully dried & The plates are securely bonded together, it’s time To paint them. Choose outdoor spray paint in vibrant colors that will complement your outdoor space. Hold The spray can a few inches away from The plates & apply an even coat of paintCreate Stunning Glass Plate Garden Flowers. Allow The paint To dry completely before moving on To The next step.
Pro tip: Use stencil templates or painter’s tape To create intricate designs or patterns on The plates.
Step 3: Attach The Garden Stakes
To display your glass plate garden flowers in The soil, you will need To attach garden stakes or rebar To The back of each flower. Apply a generous amount of ceramic or glass adhesive To The bottom of The flower & press The stake firmly into it. Allow The adhesive To dry according To The manufacturer’s instructions before planting The flowers in your garden.
Pro tip: Paint The garden stakes in coordinating colors To enhance The overall aesthetic of your garden.
Caring for Your Glass Plate Garden Flowers
Now that your glass plate garden flowers are complete, it’s important To take proper care of them To ensure their longevity. Here are some tips:
- Place The flowers in an area of your garden that receives partial or filtered sunlight. Direct sunlight may cause The paint To fade over time.
- During The winter months or extreme weather conditions, consider bringing The flowers indoors To protect them from damage.
- Clean The glass plates regularly with a soft cloth To remove dust & debris.
- Refresh The paint as needed To maintain The vibrant colors of your flowers.
Comparison: Glass Plate Flowers vs. Traditional Garden Decor
| Aspect | Glass Plate Flowers | Traditional Garden Decor |
|---|---|---|
| Aesthetic Appeal | 🌸🌈🌼 | 🌿🌻🏡 |
| Durability | 💎🌧️🌬️ | 🪴☀️🌦️ |
| Customizability | 🎨✨🌸 | 🖌️🏺🌼 |
| Seasonal Adaptability | 🌞🌧️🍂 | 🌸🌿❄️ |
As you can see, glass plate flowers offer a unique aesthetic appeal with their vibrant colors & whimsical designs. They are also durable & customizable, allowing you To create one-of-a-kind pieces of art for your garden. Additionally, glass plate flowers can withstand different weather conditions, making them suitable for year-round use.
Experience with Glass Plate Garden Flowers
I recently tried my hand at creating glass plate garden flowers, & it was a truly enjoyable experience. The process was straightforward, & The end result was stunning. I loved how The vibrant colors of The painted plates added a burst of color To my garden. It was a great way To express my creativity & add a personal touch To my outdoor space.
If you’re looking for a fun & rewarding DIY project, I highly recommend giving glass plate garden flowers a try. They are a beautiful & unique addition To any garden, & The process of creating them is both relaxing & fulfilling.
So why not gather your materials, put on your creative hat, & start crafting your own stunning glass plate garden flowers today? You won’t be disappointed!
For more inspiration & ideas, check out this guide on how To make a garden art dish flower.
Remember, The possibilities are endless when it comes To creating these beautiful pieces of art. Let your imagination run wild & have fun with The process!
For more gardening tips & tricks, visit Garden Beta.
How do I create stunning glass plate garden flowers?
To create stunning glass plate garden flowers, you can follow these step-by-step instructions.
What materials do I need?
To get started, gather The following materials:
- – Glass plates
- – Craft paint
- – Paintbrushes
- – Glass adhesive
- – Metal stakes
- – Epoxy adhesive
- – Glass gems or beads
- – Clear sealant spray
How do I prepare The glass plates?
Start by cleaning The glass plates with soap & water. Ensure they are completely dry before proceeding.
What painting techniques can I use?
You can use various painting techniques such as acrylic pouring, brush strokes, or even glass staining To add colorful designs To your glass plates.
How do I attach The glass plates together?
Using glass adhesive, carefully glue The glass plates together, ensuring they are aligned & securely bonded. Allow The adhesive To dry completely.
How do I make The flowers stand upright?
Attach metal stakes To The backside of The glass plate flower using epoxy adhesive. This will allow The flowers To stand upright in your garden or flower beds.
Can I add decorative elements To The flowers?
Absolutely! You can enhance The beauty of your glass plate garden flowers by adding glass gems or beads To The center of each flower. Simply use adhesive To secure them.
Should I seal The finished flowers?
To protect your glass plate garden flowers from weather elements, it is recommended To spray them with a clear sealant. This will ensure their longevity & durability.
Create Stunning Glass Plate Garden Flowers, creating stunning glass plate garden flowers requires creativityCreate Stunning Glass Plate Garden Flowers, patience, & attention To detail. Enjoy The process & The beauty they will bring To your outdoor space!
Conclusion
In conclusion, creating stunning glass plate garden flowers is an enjoyable & visually appealing activity that can enhance The beauty of any garden or outdoor space. By following this step-by-step guide, you can easily create your own unique glass plate flowers with just a few simple materials & techniqueCreate Stunning Glass Plate Garden Flowerss.
Using a conversational tone & simple language throughout The guide, we have made it easy for even beginners To understand & follow along. By avoiding jargon & complex terms, we ensure that everyone can enjoy The process of making these beautiful glass plate flowersCreate Stunning Glass Plate Garden Flowers.
Not only do these flowers add an artistic touch To your garden, but they also provide a sustainable & low-maintenance alternative To real flowers. With their vibrant colors & captivating designs, they can instantly transform any dull corner into a stunning focal pointCreate Stunning Glass Plate Garden Flowers.
By following The steps outlined in this guide, you can experiment with different glass plates, designs, & arrangements To create your own unique garden masterpiece. From selecting The right plates To cutting, painting, & assembling themCreate Stunning Glass Plate Garden Flowers, we have provided easy-To-follow instructions at every stage.
Create Stunning Glass Plate Garden Flowers, The key To creating stunning glass plate garden flowers is To let your creativity flow & have fun with The process. Don’t be afraid To experiment, mix & match different colors & patterns, & personalize your creations according To your own taste & style.
Create Stunning Glass Plate Garden Flowersgo ahead, gather your materials, & start creating your very own glass plate garden flowerCreate Stunning Glass Plate Garden Flowerss. With a little bit of patience & dedication, you’ll be amazed at The beautiful results you can achieve. Enjoy The process & watch as your garden blossoms into a stunning display of artistry & creativity!