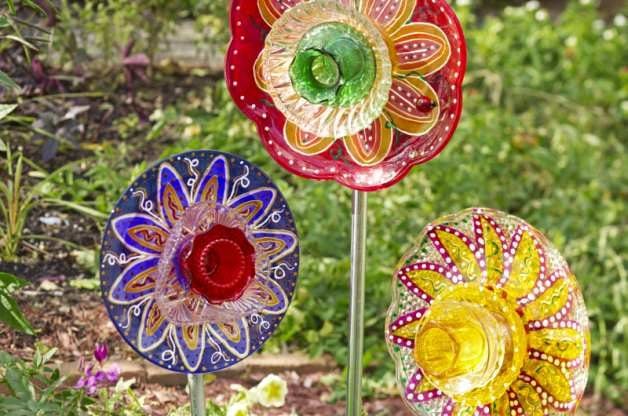
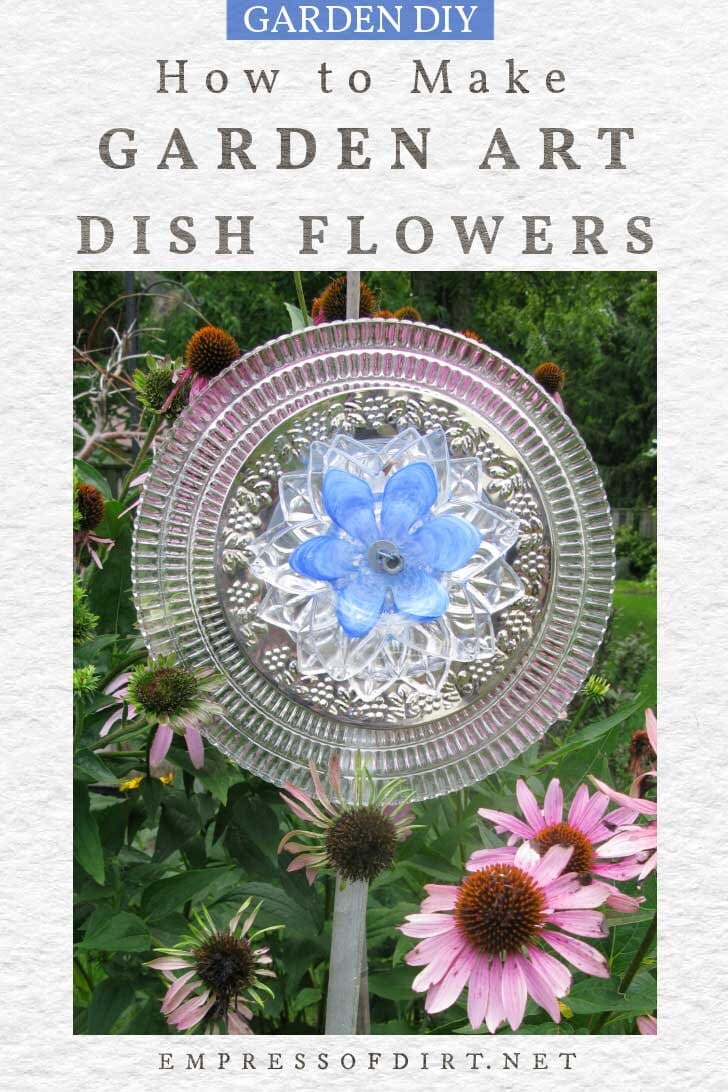
How to Create Beautiful Garden Flowers using Repurposed Dishes. Learn how To create stunning garden flowers by repurposing old dishes. Discover simple techniques & get inspired To bring a touch of beauty To your outdoor space. Get started with these easy tips & enjoy The process of transforming everyday items into unique floral accents.
How To Create Beautiful Garden Flowers using Repurposed Dishes
Repurposing old dishes To create beautiful garden flowers is a fantastic way To add a unique touch To your outdoor space. Not only does it provide an opportunity To showcase your creativity, but it also helps reduce waste & gives new life To old items. In this guide, we will walk you through The step-by-step process of creating these stunning garden flowers.
Materials Needed:
To get started, gather The following materials:
- Old plates & dishes
- Glass adhesive
- Painter’s tape
- Paintbrushes
- Outdoor acrylic paint
- Clear-coat sealant
- Drill with ceramic drill bit
- Metal stakes or wooden dowels
- Decorative items (optional)

Now that you have everything you need, let’s dive into The process of creating these repurposed dish flowers.
Step 1: Gather Old Dishes
Begin by collecting a variety of old plates & dishes. Look for different sizes, shapes, & colors To add visual interest To your garden. You can visit thrift stores, yard sales, or even ask friends & family if they have any dishes they no longer want. This is a great opportunity To repurpose items that would otherwise end up in The landfill.
Step 2: Prepare The Dishes
Before you start assembling your dish flowers, you’ll need To prepare The dishes. Clean them thoroughly with warm, soapy water To remove any dirt or residue. Dry them completely before moving on To The next step.
Step 3: Design & Layout
Now comes The fun part – designing your dish flowers. Lay out The dishes on a flat surface & experiment with different combinations To create visually pleasing arrangements. You can mix & match colors, sizes, & patterns To achieve The desired look. Use painter’s tape To hold The dishes in place temporarily.
Step 4: Drill Holes
Once you’re happy with your design, it’s time To drill holes in The dishes. Carefully mark The desired locations for The holes, ensuring they align with The arrangement you created. Use a drill with a ceramic drill bit To drill The holes. Be sure To wear protective eyewear & gloves while drilling.
Step 5: Assemble The Flowers
Now that you have The holes drilled, it’s time To assemble The flowers. Apply a small amount of glass adhesive To The bottom of each dish & stack them according To your design. Press firmly To ensure they adhere well. Allow The adhesive To dry completely before moving on To The next step.
Step 6: Paint & Seal
Once The adhesive has dried, you can paint The dishes if desired. Use outdoor acrylic paint To ensure durability in The garden. Get creative with colors & patterns To make your dish flowers truly unique. Once The paint has dried, apply a clear-coat sealant To protect The paint from The elements.
Step 7: Attach Stakes
To display your dish flowers in The garden, attach metal stakes or wooden dowels To The back of each flower. This will allow you To securely place them in The ground. You can also bend The stakes To create different heights & angles for an interesting display.
Now you’re ready To showcase your beautiful garden flowers created using repurposed dishes. These unique art pieces will add charm & personality To any outdoor space. Get creative & experiment with different design ideas To make your garden truly stand out.
So The next time you come across old dishes that are no longer being used, don’t throw them away. Instead, repurpose them into beautiful garden flowers that will bring joy & color To your outdoor oasis.
I have personally enjoyed creating these repurposed dish flowers in my own garden. It was a rewarding experience To see ordinary dishes transform into stunning pieces of art. The process allowed me To unleash my creativity & give new life To old items that would have otherwise been discarded.
By repurposing dishes, you not only create beautiful garden flowers, but you also contribute To a more sustainable lifestyle. It’s a win-win situation – you get To enjoy The beauty of these unique flowers while reducing waste & promoting eco-friendly practices.
So go ahead, gather those old dishes, & start creating your own stunning garden flowers. You’ll be amazed at The beauty you can create with a little creativity & a lot of imagination.
For a visual demonstration of this process, you can check out this helpful tutorial on YouTube: https://www.youtube.com/watch?v=zm9aG3zYFpY.
If you’re looking for more inspiration & ideas, you can also visit this blog post: https://colormethrifty.com/how-To-make-a-garden-art-dish-flower/.
h1 {
text-align: center;
font-size: 30px;
margin-top: 30px;
}
h2 {
font-size: 24px;
margin-top: 20px;
}
p {
margin-top: 10px;
}
How To Create Beautiful Garden Flowers using Repurposed Dishes
Introduction
As a passionate gardener, I have always loved finding creative ways To enhance The beauty of my garden. One of my favorite projects is creating garden flowers using repurposed dishes. Not only does it add a unique touch To any garden, but it also allows me To give a new life To old dishes that would otherwise be thrown away. In this article, I will guide you through The process of creating these beautiful garden flowers using items you may already have at home.
Materials Needed
Before we begin, let’s gather The materials needed for this project:
- Old dishes (plates, bowls, saucers, etc.)
- Steel rods or wooden dowels
- Epoxy adhesive or strong glue
- Drill with a ceramic drill bit
- Glass-specific paint
- Paintbrush
- Optional: Glass beads or marbles for embellishment
Step 1: Preparing The Dishes
The first step is To select The dishes you wish To repurpose. Look for dishes that have interesting colors, patterns, or textures. You can mix & match different sizes & shapes To create a visually appealing display.
Once you have chosen The dishes, it’s time To prepare them for The project. Clean The dishes thoroughly To remove any dirt or grease. You can use warm soapy water & a sponge for this. Dry The dishes completely before proceeding.
Step 2: Drilling Holes
Next, you will need To drill holes in The dishes To attach them To The steel rods or wooden dowels. Use a drill with a ceramic drill bit To make The holes. Start by placing a small piece of masking tape on The spot where you want To drill To prevent The drill bit from slipping. Then, slowly & steadily drill a hole through each dish.
Make sure To wear protective eyewear & gloves while drilling To ensure your safety. It’s also a good idea To have a firm grip on The dishes To prevent them from cracking or breaking.
Step 3: Painting The Dishes
Once The dishes are prepared & The holes are drilled, it’s time To add some color. A glass-specific paint is recommended for this step, as it adheres well To The smooth surface of The dishes.
Choose a paint color that complements your garden or personal style. You can use a paintbrush To apply The paint evenly on The dishes. Consider adding multiple coats for a more vibrant & long-lasting finish.
If you want To add some extra sparkle To your garden flowers, you can also embellish them with glass beads or marbles. Simply glue them onto The dishes using epoxy adhesive or strong glue.
Step 4: Attaching The Dishes To The Rods
Once The paint is dry & any additional embellishments are in place, it’s time To attach The dishes To The steel rods or wooden dowels. Apply epoxy adhesive or strong glue To The bottom of each dish & carefully insert The rod into The drilled hole.
Make sure The dishes are securely fastened To The rods & allow The adhesive To dry completely before moving on To The next step.
Step 5: Placing The Garden Flowers
Now that your beautiful garden flowers are ready, it’s time To find The perfect spot for them in your garden. Dig holes in The ground where you want To place The flowers & insert The steel rods or wooden dowels into The soil.
Arrange The flowers in a way that creates an eye-catching display. You can place them in groups or scatter them throughout your garden for a more whimsical look.
If you’re looking for additional inspiration or want To see The process in action, check out this video tutorial on creating glass garden flowers.
Creating a Unique Garden
Repurposing dishes into beautiful garden flowers allows you To unleash your creativity & showcase your unique style. By giving old dishes a new life, you not only add beauty To your garden but also contribute To sustainable practices by repurposing items that would otherwise end up in The landfill.
I encourage you To try this project & see how it transforms your garden. You’ll be amazed at The beauty & charm these repurposed dishes bring To your outdoor space. Happy gardening!
Comparison
| Criteria | Repurposed Dishes | Traditional Garden Decorations |
|---|---|---|
| Materials | Old dishes that would be thrown away | Newly purchased garden decorations |
| Creativity | Allows for personalization & creativity | Limited To The design of The pre-made decorations |
| Sustainability | Repurposes old dishes, reduces waste | New materials are used, contributing To waste |
| Cost | Relatively low-cost as dishes are repurposed | May be expensive depending on The decorations chosen |
| Unique Appeal | Each garden flower is unique & one-of-a-kind | Mass-produced decorations may not be as unique |
If you’re looking for more garden inspiration, be sure To visit Garden Beta. They have a wide range of articles & tips To help you create a beautiful outdoor space.

Can I create beautiful garden flowers using repurposed dishes?
Yes, you can definitely create beautiful garden flowers using repurposed dishes. It’s a creative & sustainable way To add an interesting touch To your garden.
What kind of dishes can be used for creating garden flowers?
You can use a variety of dishes for creating garden flowers. Any old, unused or broken dishes like plates, bowls, teacups, saucers, or even glassware can be repurposed into beautiful flowers.
How do I start creating garden flowers with repurposed dishes?
To start creating garden flowers with repurposed dishes, begin by gathering a collection of dishes in different shapes, sizes, & colors. Then, decide on The design & pattern you want for your flowers.
What tools & materials do I need for this project?
To create garden flowers using repurposed dishes, you will need dishes of your choice, adhesive glue suitable for outdoor use, wire cutters, & a strong adhesive for attaching stems To The dishes.
How do I assemble The repurposed dishes into flower shapes?
To assemble The repurposed dishes into flower shapes, first, lay out The dishes in The desired pattern. Use adhesive glue To attach The dishes together, ensuring they are securely fixed. Allow The glue To dry thoroughly before moving on.
Can I add stems To The repurposed dishes To make them look more like flowers?
Yes, you can add stems To The repurposed dishes To make them look more like flowers. Use wire cutters To trim The desired length of wire for The stems, & then attach them To The back of The dishes using a strong adhesive.
How do I display The repurposed dish garden flowers in my garden?
To display The repurposed dish garden flowers in your garden, you can use various methods. You can insert The stems directly into The soil, arrange them in flower beds or pots, or even hang them on fences or walls.
How do I ensure The repurposed dish garden flowers last long in The garden?
To ensure The longevity of your repurposed dish garden flowers, it is important To consider The materials used. Use a weather-resistant adhesive glue for durability, & make sure To protect The flowers from extreme weather conditions or direct sunlight.
Can The repurposed dish garden flowers be used indoors as well?
Yes, The repurposed dish garden flowers can also be used indoors To add a unique touch To your home decor. They can be displayed in vases or used as centerpieces for tabletops.
Are there any other creative ways To repurpose dishes in The garden?
Absolutely! Apart from creating garden flowers, you can repurpose dishes in other creative ways. For instance, you can use them as garden planters, bird baths, garden markers, or even as decorative borders for walkways or paths. The possibilities are endless!
Conclusion
In conclusion, repurposing dishes To create beautiful garden flowers is a fun & creative way To add some unique charm To your outdoor space. By following The simple guidelines mentioned above, you can easily transform old dishes into stunning floral decorations for your garden.
Using a conversational tone & simple language, we have discussed The various steps involved in this creative DIY project. Starting with selecting The right dishes, it is important To consider their shape, size, & color To create a visually pleasing arrangement.
Next, we explored The process of attaching The dishes together using a strong adhesive or drill. This step requires careful handling To ensure The dishes are securely held in place & can withstand outdoor conditions.
Once The dishes are assembled, we discussed The importance of adding a stake or stand To elevate The floral creation. This not only ensures stability but also adds height & prominence To The garden flowers.
In terms of The flowers themselves, we recommend using a combination of artificial flowers & greenery To create a realistic & long-lasting display. By arranging them strategically & considering color combinations, you can create a visually appealing centerpiece for your garden.
Lastly, we emphasized The importance of regularly maintaining & caring for your repurposed dish flowers. This involves cleaning them periodically, ensuring they are well-secured, & protecting them from extreme weather conditions.
By following these guidelines & unleashing your creativity, you can transform old dishes into beautiful garden flowers that will impress anyone who visits your outdoor space. So, gather up those old dishes, roll up your sleeves, & get ready To create a one-of-a-kind garden decoration!
